Pages

Tuesday 25 September 2012

[WIP] Japanese Chrysanthemum

Taking longer time than I thought before. I've already started painting the Japanese Chrysanthemum in my spare time for these 2 -3 days and seem it won't be finished soon.


The red mixes were Permanent Rose, Opera Rose, Quinacridone Red, Cadmium Yellow Pale and a lil amount of French Ultramarine.
Previous post: The Sketch

Sunday 23 September 2012

[TIPS] Chrysanthemum: A Touch of Dry Brush


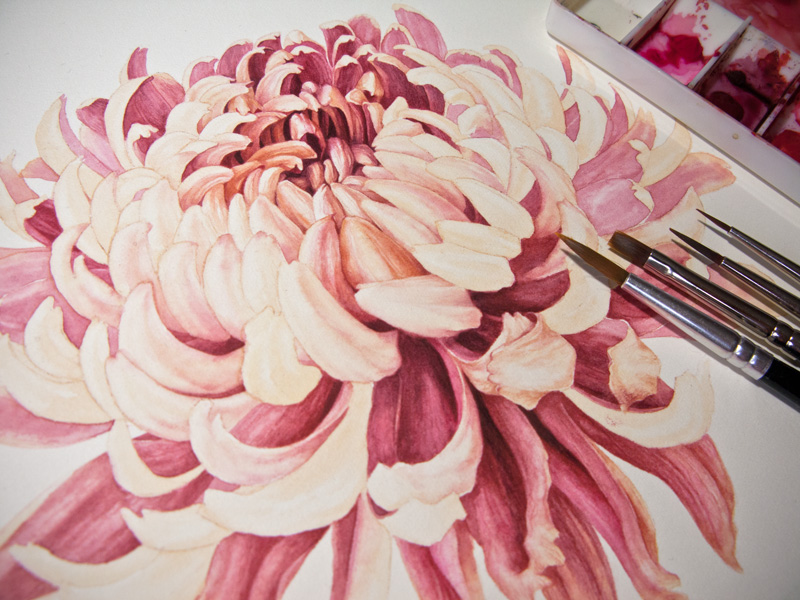
Wet in wet and glazing are watercolour techniques I use the most, but sometimes an object requires a different technique. This Chrysanthemum flower has hard edged/ broken pattern with striking colour on each petal. For it, I need a touch of dry brush technique.

Dry brush is the opposite technique to 'wet in wet'. It involves more pigment, less water and a completely dry paper.

My tips:
1. Make sure the paper and the background colours completely dry.
2. Make a fairly dark mix with just a little water.
3. Load the brush and use kitchen roll/ tissue paper to remove excess fluid.
4. Flatten the end of the brush to separate its hairs slightly.
5. Drag the brush along the area you want then gently lift it off before the end.
6. To have a fully patterned petal's tip, use paper or masking fluid to cover white paper.
7. Establish the wanted effect (e.g. scratchy look) on other paper. It is good to exercise a just pressure and dryness. Once you get what you want, work on the actual piece.

Saturday 22 September 2012

[TIPS] Taking Care of Watercolour Brushes from Rosemary

A few month ago NSBA got a special guest, Rosemary, a brush maker with 30 years of experience. She demonstrated how to create rounded, flat and fans shape Kolinsky Sable brushes. She also pointed out various forms of brush that I saw for the first time, the sword lines, triangular point, comber, 'tadpole'/ extended point brushes, and some more. Everything was done manually, including how to make the strongest sable hair in the middle of the brush and how to get the tip of the brush taper. A very interesting demonstration.


Later Rosemary shared some tips on taking care of watercolour brushes. I didn't make a note of all of them, but I keep some relevant tips for my self:


1.
Always clean brushes thoroughly after each painting session. For Kolinsky or Sable, rinse in cold water. Remove as much moisture as possible with kitchen roll and reshape before storing.

2. To prevent brush's handle from loosening/ cracking, try to keep handles dry when you dip the brush head into water. Only wet the ferrule.

3 Expensive/ perfect pointy brushes shouldn't be used to mix the paints.

4. Another special treatment is to recondition your sables as you would your own hair! Once a year, take ordinary hair conditioner and apply just one or two drops to the heads allowing to soak, then rinse well before storing again.

I also ask what to do to repair a bent synthetic (nylon) brush, she said to dip it in boiled water for about 2 seconds, reshape the head and let it dry naturally. Warning! It was for synthetic brushes only, never do it to natural Kolinsky/ Sable brushes.

Sunday 16 September 2012

[WIP] Japanese Chrysanthemum

Autumn is coming and I just met its lovely and delicate flower, Japanese Crysanthemum. Just settled down the sketch, I hope I will have time to paint on it soon.


Saturday 15 September 2012

Oriental Poppies: Zoom it in!

Yesterday I read Mattias's blog and found a feature to see the details of his work. Very cool! I made it for my Oriental Poppies.

Just ZOOM in on it to see the details :)


P.S. I don't have to share a huge file to let anyone enjoy my work with all the details anymore. What I need to do is just keeping the big file in a dropbox folder in my computer (or flickr, or any server you like) then giving the link to Zoom.it. Zoom it will do the rest and you can share your work excellently. Enjoy! :)

Sunday 9 September 2012

Pebeo | Winsor&Newton Masking Fluid


A few years ago, I won't have many options for watercolour papers or medium in Indonesia as I have now in the UK, such as masking fluid, a latex-rubber fluid that is applied to retain the white watercolour paper or wash underneath. I used to know only Winsor & Newton art masking fluid.

Since I start practising botanical art which often requires delicate details and sometimes a very tiny area to preserve, I made a time to browse a better option for masking. I found Pebeo drawing gum and I am happy I did it!

I like that Pebeo is significantly coloured (grey). It is nice to easily see where the masking is already applied. I love that Pebeo is thinner or more liquid than W&N masking fluid, so it is easy for making sharp edges and reaching the paper's deep texture quickly. I'm also fond of Pebeo for lasting a long time and not making solid gum on the bottle's neck and cap when not in use. I like that the cap is also easier to open than W&N.

I haven't tried other brands yet. I heard about other masking fluids whose bottle has a special nib so I don't need a brush and just gently squeeze the bottle to apply the masking. I may tried them later but for now, I am happy with what I've had. I never be worried about paper tearing or brush clogging as long as the masking fluid used appropriately. Read more tips HERE.

Comparison of the colour. Using dip/ ruling pen will give thicker masking and so darker colour than using a brush. Since I use brushes more often, I prefer the grey Pebeo that is easily seen on white paper.


Comparison of the thickness. I can't show you well the significant difference of thickness between Pebeo and W&N masking fluid but it was easier for me to move the brush/dip pen with Pebeo than W&N masking fluid. You can see the the branch silhouette in left painting has longer and steadier strokes.


Comparison of the sharp/clean edges. I love that the anthers of flower in the left image have sharper and rounder edges than the right one.